[This post got a mention on Microsoft Channel 9 This Week]
Nokia Lumia 1520 is a gorgeous phone. So is your Windows Phone app’s hub in panorama. And you do know that a well developed app is just the half way. Getting the app to its audience is the second half. I created this layered GIMP image to easily sandwich a panorama hub between the layers and showcase your app with your own shining colors. You need to do following to create your app’s panorama with this template:
- Have all your panorama pages in a single image. 4 or 5 pages will work great.
- Copy aforesaid panorama image in this XCF.
- Adjust perspective, add your colors, and export!
With very little efforts you can have your app in your choice of colors.
Following is the detailed step-by-step of the process with example of Windows Phone Channel 9 app:
First, grab the GIMP XCF (PSD here). If you do not have GIMP, download here, it’s open-source and free. Prepare an image of all the panorama items of your app (a little help here).
Layers!

Open PanoramaAppShowcaseOn1520.xcf in GIMP. Look at the Layers windows. There are multiple groups and layers inside. Some layers/groups are not editable. Their names start with [DoNotEdit]. So, do not edit them. The layers you will be editing are – “YourApp.YourAppGoesHere”, “UseBucketToolAndFillAnyColorHere”, and “UseBucketToolAndFillBackgroundColor”.
Bring Your App In

- Open “YourApp” layer group and select “YourAppGoesHere” layer.
- Copy or Open As Layer from File menu, your app’s panorama image. If you Open As Layer, drag it down to just above YourAppGoesHere and right click and merge down. If you copy, as you see in image, a floating layer will be created.
- Click on Anchor the floating button at the bottom. You will see now your panorama image is in the layer YourAppGoesHere
Prepare to Skew

- Make sure YourAppGoesHere layer is selected.
- Slide opacity to about 50.
- Select Layer > “Autocrop Layer” menu to crop this layer. You will see yellow marching ant line around the layer
- Choose perspective tool.
Go 3D

The layer now has a grid with 4 handles on corners.
- Grab a corner and drag it as close as possible to the corresponding corner on white base. Don’t worry about matching corners exactly, just keep close. Repeat the process for all corners. Look at black arrows in the image.
Now your image’s layout looks something like this:

Micro Adjust and Transform

You are still in Perspective transform edit mode. Here you will zoom-in to every corner and match every corner exactly with the corner of the white base.
- To zoom-in to the corner you want to adjust, take your mouse pointer on the corner, and ctrl+mousewheelup to zoom-in max. Match both the corners pixel perfect. Repeat for all the four corners. Zoom-in and out to make sure all the corners are matching.
- Click on Transform button.
Your image now looks something like this:

Your Colors

These steps are to easily change phone’s color.
- Select UseBucketToolAndFillAnyColorHere layer.
- Click on foreground color and pick a color from color picker.
- Select Bucket tool from Tools menu
- Click anywhere inside the image
More Color and Done

- If you want to edit background color select UseBucketFillBackgroundColor.
- Click on foreground color and pick a color from color picker.
- Click anywhere on image
- Open File menu and select Export As… Type “filename.png” in the File Name field and save.
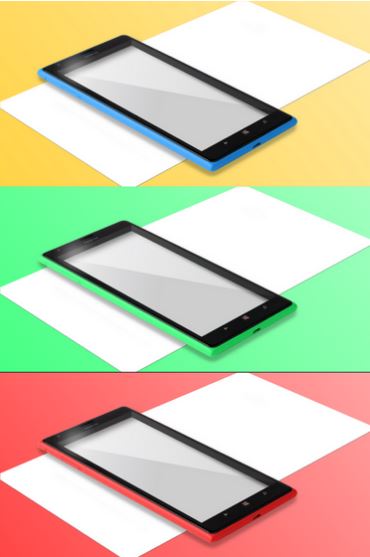
If everything goes well, you will have a gorgeous image like this for your app:

And this is my app in the same template:


")


