(If you are a C# | XAML dev and prototype cross-platform apps, Xamarin anyone, these template projects can make your job very easy!)
This is third post in the series of SketchFlow template projects for prototyping apps for mobile devices. Last two posts were for Windows Phone & iPhone 6.
Pull this and various platform template SketchFlow projects from GitHub.
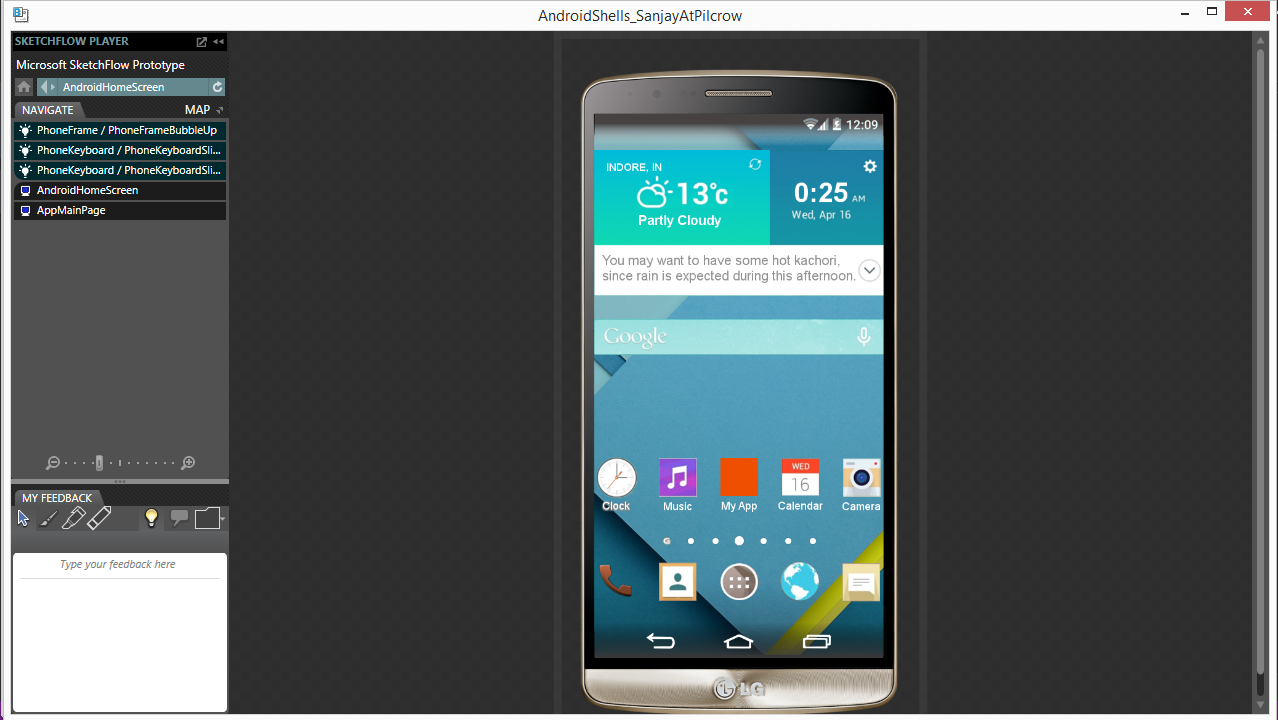
This post introduces Android Lollipop template project for SketchFlow. For this first Android template I chose LG G3 phone skeleton as base and added Lollipop home screen for more in-time feel in prototype. As and when I get time I will add more Android devices which can be easily swapped in the prototype in seconds.
For a quick demo of Android Lollipop prototype template project, have a look at this video:
You are toying with an idea of creating a new app. If you are not replicating functionality of some other app, you would go through the process of visualizing your idea in the form of app UI. You don’t want to jump into code at this time but want to feel how information in the app will be placed and how it will look inside the screen boundaries. This process is a pre-cursor to UX development or full-fledged wire-frame creation. This process of visualizing the idea takes some time before you are confident about how you want to take your app forward and jump into some sort of coding. Paper+pen or whiteboard+marker are good way to work through fluid ideas and layout information. This is not the phase when you are working on UX or designing UI, but just laying out ideas in rough screens. I personally like drawing and…
I have updated Microsoft Blend SketchFlow project for latest iPhone 6 frame. Download projects from GitHub. As earlier the project has built in iPhone 6 frame, animated keyboard image, iPhone 6 home screen, and clickable home button.
My earlier posts have detailed information about other Sketchflow projects and video tutorial of how to use them.
SketchFlow is a powerful prototyping tool. In last post I shared Windows Phone SketchFlow template project. Here I am sharing iPhone skeleton project for SketchFlow. Both these projects are similar in functionality with different phone frames. Android projects are on their way. Read more…
SketchFlow is a powerful prototyping tool. In last post I shared Windows Phone SketchFlow template project. Here I am sharing iPhone skeleton project for SketchFlow. Both these projects are similar in functionality with different phone frames. Android projects are on their way.
Those who have exposure to Visual Studio Blend, WPF/Silverlight developers, SketchFlow comes as natural extension to quickly prototype app ideas. Other prototyping tools are – Pencil, Balsamiq,Axure, SmartDraw, Visio etc. Recently, I wrote an introductory post about open source prototyping tool, Pencil, with example navigation flow screens. In my experience I found SketchFlow to be very efficient in creating high-fidelity prototypes. This project template gives, out-of-the-box, phone frame images, dummy keyboard with interactive states, back button, and home button. The phone frame images included are – Windows Phone emulator stock image, Nokia Lumia 925, Nokia Lumia 1520, and HTC One. Android phones and iPhone are in plans.
For a quick demo, have a look at this video:
Following are some screen shots of the SketchFlow player:
SketchFlow is one of the best prototyping tools available. SketchFlow is part of Blend which is now an integrated tool with Visual Studio. Those who have exposure to Blend, WPF/Silverlight developers, SketchFlow comes as natural extension to quickly prototype app ideas. Other prototyping tools are – Pencil, Balsamiq,Axure, SmartDraw, Visio etc. Recently, I wrote an introductory post about open source prototyping tool, Pencil, with example navigation flow screens. In my experience I found SketchFlow to be very efficient in creating high-fidelity prototypes. SketchFlow provides free form screens to create any type of prototypes – web site, web app, SPI, desktop app, or smartphone apps. This is powerful. But, with great power comes great boilerplate work :D. I so needed some kind of Windows Phone specific template project in SketchFlow which I could use to quickly draw my pages in and let template take care of generic phone specific look and feel (interactions). I didn’t find one. So I created one. This project template gives, out-of-the-box, phone frame images, dummy keyboard with interactive states, back button, and home button. The phone frame images included are – Windows Phone emulator stock image, Nokia Lumia 925, Nokia Lumia 1520, and HTC One. Android phones and iPhone (available now) are in plans.
Watch this video for a quick go through of the project and also to know how you can swap phone frames in seconds, throughout all prototype screens in the project:
Following are some of the screen shots of the project in action:
Something is cooking in the background? Do not forget to inform your user. A modern, flat, light weight, wait spinner is an animated and prominent way to inform user about running background processes (you would not have long running processes on the UI thread, right? See how to effectively free up UI). You would choose to show this control in that area of the screen to which the information, related to which the BG work is taking place – loading/processing etc, belongs. You may have multiple information points on screen for which background work is running.
For this step-by-step we will create this example:
A practical example of implementation of this spinner is this panorama app there are two wait spinners being used, one in Quick Stopwatch pano, and other in Recent pano. When data related to Quick stopwatch is loading, the wait spinner shows beside the title “Quick”, and when data related to Recent is loading, the wait spinner shows near the pano title “Recent”. This way user is informed about which section of the app is doing something in the background.
Don’t have this app on your Windows Phone? Visit here
Let’s go through step-by-step of creating a WaitSpinner UserControl and using it in a page.
Step 1 : Create Solution and Project
Create a project in VS with the name “WaitSpinner”. The solution gets created automatically.
Right click on the solution in Solution Explorer, and choose “Add”>”New Project”.
Select Class Library type project and name it “XAMLControls”.
Step 2 : Create UserControl
Right click on XAMLControls and select “Add”>”New item”.
Choose User Control and name it “UCWaitSpinner”.
A new UCWaitSpinner.xaml and its code behind is created.
Step 3 : Open in Blend
Right click on UCWaitSpinner.xaml and choose to open in Blend. Depending on the version of Visual Studio the view you get might be a little different, but most of the UI will be similar. You will get something like this:
Step 4 : Change the type of Layout control
Change the type of Layout from Grid to ViewBox.
Step 5 : Add a new Grid to Layout ViewBox
Choose Grid from control and right click and drag in XAML design view area.
Update Layout properties; Height and Width to 50, HorizontalAlignment and VerticalAlignment to Stretch.
Step 6 : Add Outer border
Choose Ellipse tool from Toolbox and create a circle in the design area. Don’t worry about size and fill at this point.
Make sure Ellipse is selected.
In Properties.Brushes;
Set Fill to “No Brush”.
Set Stroke to “PhoneForegroundBrush”.
In Layout section;
Set HorizontalAlignment to stretch.
Set VerticalAlignment to stretch.
Set all margins to 0.
Step 7 : Add axis for hands
Choose Ellipse tool from Toolbox again and create a circle in the middle of XAML design. Don’t bother about size at this point.
Make sure this ellipse is selected.
In Properties.Brushes;
Set Fill to “PhoneForegroundBrush”.
Set Stroke to “No Brush”.
In Layout section;
Set Width and Height to 5.
Set HorizontalAlignment to center.
Set VerticalAlignment to center.
Set all margins to 0.
Step 8 : Add minute and hour hands
Choose Rectangle tool from Toolbox and create a rectangle in the design area. Don’t worry about size and placement at this point.
Rename the [Rectangle] to “MinuteHand”.
Make sure you have MinuteHand selected.
In Properties.Brushes;
Set Fill to “PhoneForegroundBrush”.
Set Stroke to “No Brush”.
In Layout section;
Set Width to 2 and Height to 20.
Set HorizontalAlignment to Center.
Set VerticalAlignment to Bottom.
Set Bottom margin to 25 and all others to 0.
In Properties.Transform;
Select Center Point tab.
Set X to 0.5.
Set Y to 1.
Copy and paste “MinuteHand” control and name it “HourHand”. Keep everything same and change only the Properties.Layout.Height to 13.
Step 9 : Create Storyboard for moving hands
In Objects and Timeline, click on “+” sign to add a new storyboard.
Name the storyboard as “MoveHands”.
Step 10 : Create animation for minute hand
In timeline window slide the marker to 3 second.
Select MinuteHand control.
In Properties.Transform select Rotate tab and set Angle property to 1440.
Step 11 : Create animation for hour hand
Select HourHand control.
In Properties.Transform select Rotate tab and set Angle property to 360.
c. In timeline windows click on play button to see hands are rotating properly (Hour hand completes 1 rotation and minute hand completes 4 rotations in 3 seconds).
        public void Start()
        {
            MoveHands.Stop();
            AppearClock.Begin();
            MoveHands.Begin();
        }
Step 16 : Add stop functionality
Add a public Stop methods to the class:
        public void Stop()
        {
            DisappearClock.Begin();
        }
Step 17 : Build
Build XAMLControls project. If your project builds properly you should see UCWaitSpinner listed in your Toolbox in XAML Controls.
Step 18 : Add spinner to form
Open MainPage.xaml from the main project WaitSpinner and drag UCWaitSpinner from the Toolbox to the page. Open MainPage.xaml in code view and your will find the newly added control in ContentPanel:
In MainPage.xaml name UCWaitSpinner control as “waitSpinner”, add Height and Width properties with a value of 120 in both, and wrap the control in a StackPanel: