Prototype Android Apps in Microsoft SketchFlow

Prototype Android Apps in Microsoft SketchFlow

(If you are a C# | XAML dev and prototype cross-platform apps, Xamarin anyone, these template projects can make your job very easy!)

This is third post in the series of SketchFlow template projects for prototyping apps for mobile devices. Last two posts were for Windows Phone & iPhone 6.

Pull this and various platform template SketchFlow projects from GitHub.

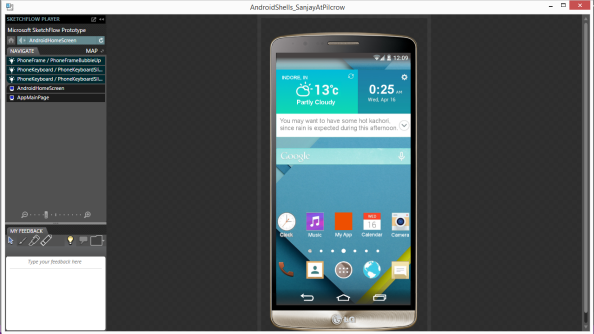
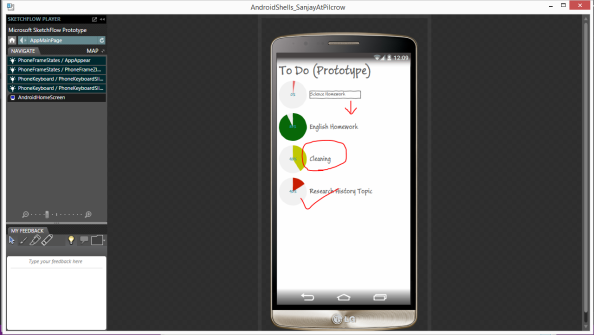
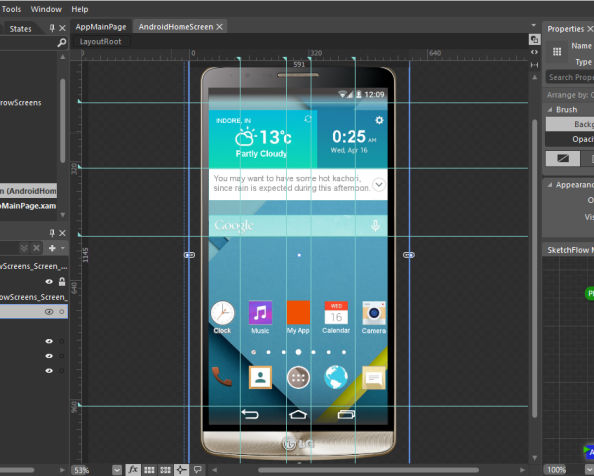
This post introduces Android Lollipop template project for SketchFlow. For this first Android template I chose LG G3 phone skeleton as base and added Lollipop home screen for more in-time feel in prototype. As and when I get time I will add more Android devices which can be easily swapped in the prototype in seconds.

For a quick demo of Android Lollipop prototype template project, have a look at this video:

Some screenshots of the project in action:
Screen_2 Android Lollipop LG G3 Microsoft Blend SketchFlow Prototype App Development in Visual Studio

Screen_2 Android Lollipop LG G3 Microsoft Blend SketchFlow Prototype App Development in Visual Studio

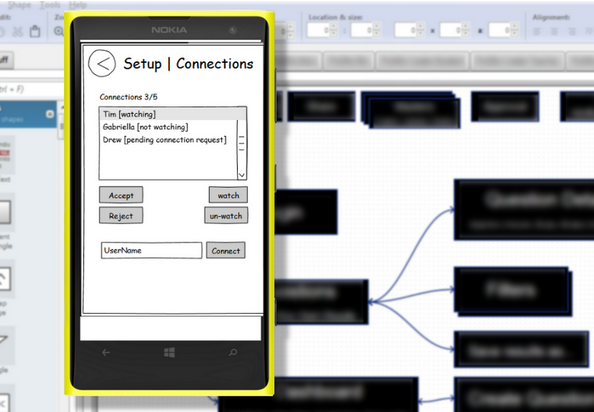
App Mock Up

App Mock Up

Sharp Snippets

You are toying with an idea of creating a new app. If you are not replicating functionality of some other app, you would go through the process of visualizing your idea in the form of app UI. You don’t want to jump into code at this time but want to feel how information in the app will be placed and how it will look inside the screen boundaries. This process is a pre-cursor to UX development or full-fledged wire-frame creation. This process of visualizing the idea takes some time before you are confident about how you want to take your app forward and jump into some sort of coding. Paper+pen or whiteboard+marker are good way to work through fluid ideas and layout information. This is not the phase when you are working on UX or designing UI, but just laying out ideas in rough screens. I personally like drawing and…

View original post 465 more words

iPhone 6 Project For App Prototyping in Microsoft SketchFlow

iPhone 6 Project For App Prototyping in Microsoft SketchFlow

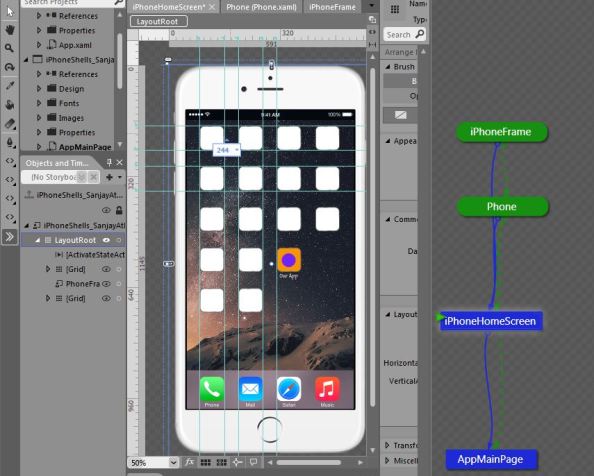
I have updated Microsoft Blend SketchFlow project for latest iPhone 6 frame. Download projects from GitHub. As earlier the project has built in iPhone 6 frame, animated keyboard image, iPhone 6 home screen, and clickable home button.

My earlier posts have detailed information about other Sketchflow projects and video tutorial of how to use them.

SketchFlow is a powerful prototyping tool. In last post I shared Windows Phone SketchFlow template project. Here I am sharing iPhone skeleton project for SketchFlow. Both these projects are similar in functionality with different phone frames. Android projects are on their way. Read more…

Prototype iPhone Apps in SketchFlow

Prototype iPhone Apps in SketchFlow

Edit: Updated for iPhone 6

Download projects from GitHub.

SketchFlow is a powerful prototyping tool. In last post I shared Windows Phone SketchFlow template project. Here I am sharing iPhone skeleton project for SketchFlow. Both these projects are similar in functionality with different phone frames. Android projects are on their way.

Download projects from GitHub.

Excerpt from earlier Post:

Those who have exposure to Visual Studio Blend, WPF/Silverlight developers, SketchFlow comes as natural extension to quickly prototype app ideas. Other prototyping tools are – Pencil, Balsamiq,Axure, SmartDraw, Visio etc. Recently, I wrote an introductory post about open source prototyping tool, Pencil, with example navigation flow screens. In my experience I found SketchFlow to be very efficient in creating high-fidelity prototypes. This project template gives, out-of-the-box, phone frame images, dummy keyboard with interactive states, back button, and home button. The phone frame images included are – Windows Phone emulator stock image, Nokia Lumia 925, Nokia Lumia 1520, and HTC One. Android phones and iPhone are in plans.

For a quick demo, have a look at this video:

Following are some screen shots of the SketchFlow player:

SketchFlow Prototype Project iPhone iOS Keyboard Windows Phone AppDev Blend Visual Studio WFP XAML Animation

SketchFlow Prototype Project iPhone iOS Keyboard Windows Phone AppDev Blend Visual Studio WFP XAML Animation

Prototype Windows Phone App in SketchFlow

Prototype Windows Phone App in SketchFlow

Download the template project from GitHub.

[This post got a mention on Microsoft Channel 9 This Week]

SketchFlow is one of the best prototyping tools available. SketchFlow is part of Blend which is now an integrated tool with Visual Studio. Those who have exposure to Blend, WPF/Silverlight developers, SketchFlow comes as natural extension to quickly prototype app ideas. Other prototyping tools are – Pencil, Balsamiq,Axure, SmartDraw, Visio etc. Recently, I wrote an introductory post about open source prototyping tool, Pencil, with example navigation flow screens. In my experience I found SketchFlow to be very efficient in creating high-fidelity prototypes. SketchFlow provides free form screens to create any type of prototypes – web site, web app, SPI, desktop app, or smartphone apps. This is powerful. But, with great power comes great boilerplate work :D. I so needed some kind of Windows Phone specific template project in SketchFlow which I could use to quickly draw my pages in and let template take care of generic phone specific look and feel (interactions). I didn’t find one. So I created one. This project template gives, out-of-the-box, phone frame images, dummy keyboard with interactive states, back button, and home button. The phone frame images included are – Windows Phone emulator stock image, Nokia Lumia 925, Nokia Lumia 1520, and HTC One. Android phones and iPhone (available now) are in plans.

Watch this video for a quick go through of the project and also to know how you can swap phone frames in seconds, throughout all prototype screens in the project:

Following are some of the screen shots of the project in action:

SketchFlow Prototype Nokia Lumia 1520 Windows Phone AppDev Blend Visual Studio

SketchFlow Prototype Project Nokia Lumia 1520 Windows Phone AppDev Blend Visual Studio

SketchFlow Prototype Application Emulator Windows Phone AppDev Blend Visual Studio

And yes, with my other project you can create prototypes for iPhone in Microsoft SketchFlow.

Happy mocking-up! 😀

C#|.NET Query String in Uri

C#|.NET Query String in Uri

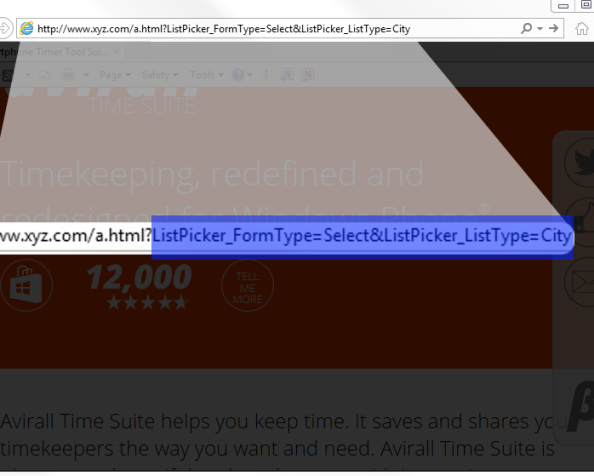
In a not-so-basic-application you might have pages which are used for multiple similar purposes. You pass query string with many fields with multiple values between such pages (or web pages). In database driven apps, parameter values could be user generated and stored in the back-end and you pull more info from database on the basis of the value in query parameter. This is not the scenario of back-end driven app. This is more about “Field Names” and Values, which are part of the design and known to you while coding, and you want to manage them effectively and make the code more readable.

Let’s take an example:

You have a page in your app which loads different lists (ex: city, state, pin, salutation, etc.) and lets user select an item from the list. At different places in your app you pop this page up with required parameters to load appropriate items. The call to page looks something like this:

this.NavigationService.Navigate("/ListPicker.xaml?ListType=city",UriKind.Relative)

Let’s assume your page also has the ability for editing and you want to activate appropriate functionality (select only || edit). You would add one more parameter to your query, like so:

this.NavigationService.Navigate("/ListPicker.xaml?ListType=city&FormType=select",UriKind.Relative)

If you have many such pages, each have multiple fields and their multiple values, and you make calls to these pages from different places in your code, soon it will be very difficult to manage hard-coded query strings in Uri’s.

Here comes enum based solution:

We will have enums for fields and their values. For the purpose of this example we will keep single enum for fields and multiple enums for values for different fields. Let’s code
First define enums for fields and their values:

        internal enum QueryFields { ListPicker_FormType, ListPicker_ListType };
        internal enum ListTypes { City, States, Zip, Salutation };
        internal enum FormTypes { Select, Edit };

If you do not wish to be more detailed, you could simply build your Uri’s like so:

This.NavigationService.Navigate("/ListPicker.xaml?{0}={1}",QueryFields.ListPicker_FormType.ToString(), FormTypes.Select.ToString());
//The resultant uri - /ListPicer.xaml?ListPicker_FormType=Select

We will see below how you could parse query parameters in the called page and retrieve values in enum types.

Creating Uri as above still has string formatting which is not easy to maintain in multiple uses. To make things manageable and less error prone, let’s create a new enum for pages in the app and shift Uri building code in a single method which could be called from anywhere in the app with different field and values.

        internal enum AppPages {ListPicker, Setting, Main, etc };
        internal static Uri GetUri(AppPages appPage, params KeyValuePair<string, string>[] args)
        {
            string uriString = "";
            switch (appPage)
            {
                case AppPages.ListPicker:
                    uriString = "/Views/ListPicker.xaml";
                    break;
                case AppPages.Setting:
                    uriString = "/Views/Settings.xaml";
                    break;
                case AppPages.Main:
                    uriString = "/Main.xaml";
                    break;
                default:
                    uriString = "/Main.xaml";
                    break;
            }
            int counter = 0;
            string seperator = "?";
            foreach(KeyValuePair<string, string> query in args)
            {
                if (counter > 0) seperator = "&";
                uriString = String.Format("{0}{1}{2}={3}", uriString, seperator, query.Key, query.Value);
            }
            return new Uri(uriString, UriKind.Relative);
        }

With GetUri, you could create page navigation Uri with enums only instead of hard-coded strings:

            KeyValuePair<string, string> query_1 = new KeyValuePair<string,string>(QueryFields.ListPicker_FormType.ToString(), FormTypes.Select.ToString());
            KeyValuePair<string, string> query_2 = new KeyValuePair<string,string>(QueryFields.ListPicker_ListType.ToString(), ListTypes.City.ToString());
            This.NavigationService.Navigate(GetUri(AppPages.ListPicker, query_1, query_2));

Once you are navigated to your page, you need to parse query strings and extract enums which you could use in the page to decide page’s functionality.

At page level you need to have required enum type fields. For this example we will have two fields, one FormTypes type and other ListTypes type. A private processQuery method which accepts a dictionary sets these two fields appropriately.

        FormTypes formType;
        ListTypes listType;
        private void processQuery(Dictionary<string, string> query)
        {
            string _formTypeName = "";
            string _listTypeName = "";
            query.TryGetValue(QueryFields.ListPicker_FormType.ToString(), out _formTypeName);
            query.TryGetValue(QueryFields.ListPicker_ListType.ToString(), out _listTypeName);
            if (_formTypeName.Length != 0) formType = (FormTypes)(Convert.ToInt32(_formTypeName));
            if (_listTypeName.Length != 0) listType = (ListTypes)(Convert.ToInt32(_listTypeName));
        }

You would call processQuery method from OnNavigatedTo method of your page.

        protected override void OnNavigatedTo(System.Windows.Navigation.NavigationEventArgs e)
        {
            Dictionary<string, string> _params = new Dictionary<string, string>(NavigationContext.QueryString);
            processQuery(new Dictionary<string, string>());
        }

If you have 100’s of case statements (to choose a page) in GetUri, and you are concerned about performance, refactore the method to accept page name with path as string. With page path name directly in string, you would not need case statements. By the way, in my case with about 80+ cases to get PageName, the query creation does not take more than 50MS, which is negligible for me. More so, navigation calls are not recursive ones.

Transparent Live Tile For Windows Phone 8.1

Transparent Live Tile For Windows Phone 8.1

Windows Phone 8.1 Dev Preview

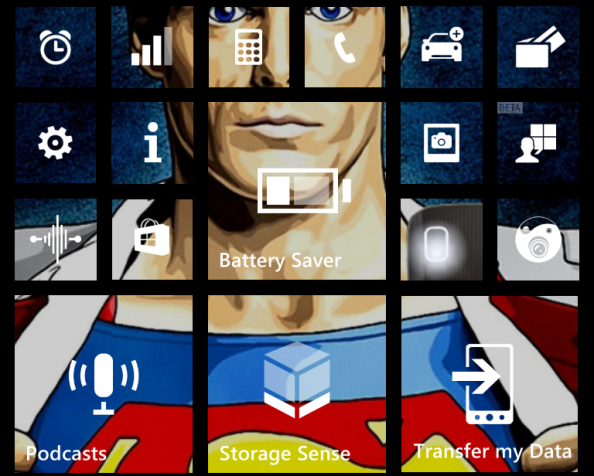
Windows Phone 8.1 developer preview is totally awesome. So what is one of the most important things app devs can do right away, without much fuss, to make their apps look great with Windows Phone 8.1? Revisit your app’s Live Tile images. Why? In 8.1, Start screen is mesmerizing with the parallax effect and Live Tile with background overlay. Dev preview users are going crazy with new Start experience, and I am sure, with public release, end users are going to love to have background image as well. Take a look at this awesome Nokia Lumia 925 Start screen:

wp_ss_20140416_0015[1]

When users have a background image, they might not like to have solid Live Tiles block their beautiful background. So, revisit your app’s Live Tile images – all of them! Check if they are transparent or not? If they are like Cortana, Avirall Time Suite, etc. in the image above, you are all set. You can safely ignore this article and find some other awesome way to improve your app for WP8.1 (think Cortana). If they are not, I suggest to update ‘em ASAP. And it’s easy, too. Let’s see how you can create transparent Live Tile images with Open Source Inkscape. You could choose to use Paint.NET (not MS Paint), Photoshop, GIMP, or any other tool which allows you to export image with transparency. Though I prefer GIMP for image editing but I chose Inkscape for this demo. Let’s go.

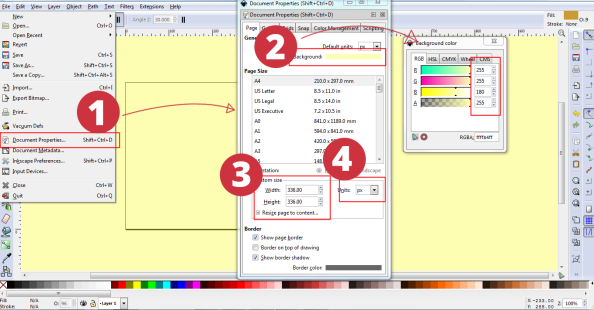
Step 1: Setup the page

InkScape01

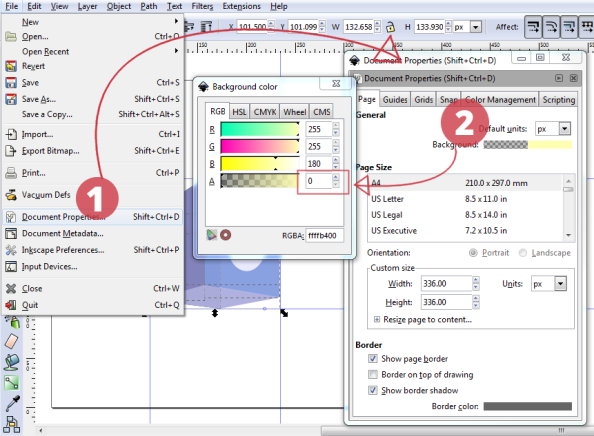
  1. Open Inkscape and create a new document and Open Document Properties from file menu.
  2. In most cases app icons are solid white, if yours is one too, change the background color of the page, temporarily, to light yellow. This is while working only so that you can see white color. Before exporting we will reset this to transparent (this is very important).
  3. This example is for 336 X 336 medium tile. So set the custom size to 336 X 336.
  4. Make sure Units is “px”.

Step 2: Setup the drawing

InkScape02

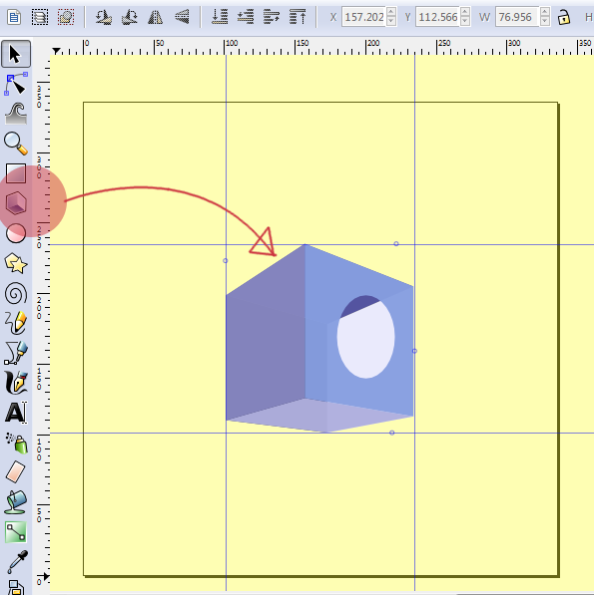
Windows Phone 8 Asset Template Guide suggests a 336 X 336 tile to have 110px margin on all sides. Create 110px margin guides on all the sides. To create margin guides click and drag from the horizontal ruler on the top and from the vertical ruler on the left.

Step 3: Create Live Tile image of your app

InkScape03

The center part between the margins is the space where your tile image will go. Create your image here. For this example I simply dragged the box from tool box and made a hole in it 😀

Step 4: Set background to transparent

InkScape03a

To create a transparent Live Tile image we would like to have a transparent background. Go back in document properties and set Background to transparent by resetting “A” to 0. If your image is solid white, you might not see anything after making the background transparent. Don’t worry, your image is there (maybe somebody can tell how working space (not document background) in Inkscape can be made a different color than white).

Step 5: Export

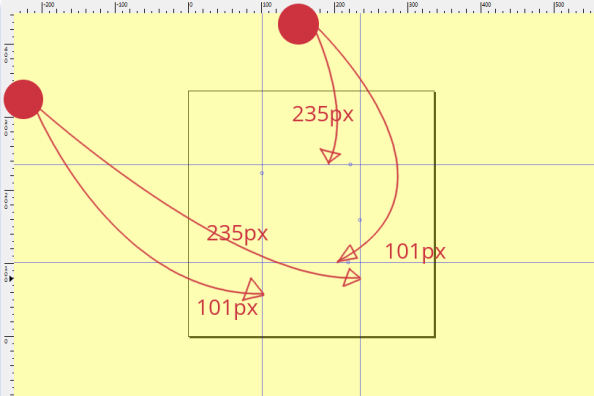
InkScape04

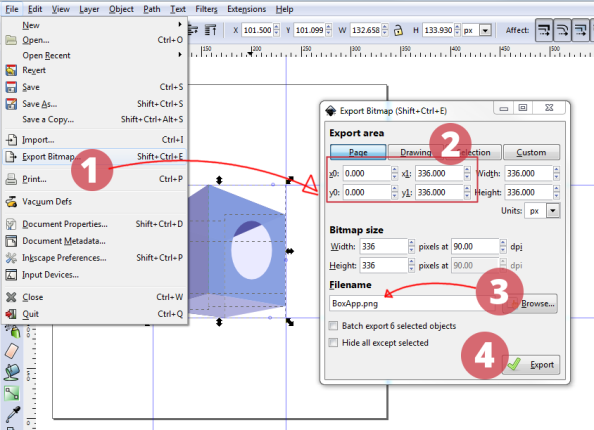
  1. Open Export dialog from File > Export Bitmap…
  2. Set X0, X1, Y0, Y1 as shown in the image above.
  3. Browse for the image location, and make sure you give “PNG” as the extension of the image, NOT JPG or BMP.
  4. Export. (Alternatively, as suggested by Austin Andrews, you could export as SVG, and use his awesome service!)

Step 6: Check Final Image

WindowsPhotoViewer05

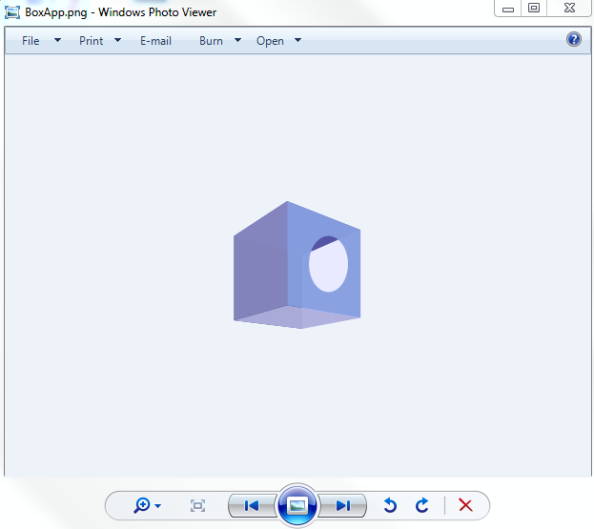
Notice that your final image does not have a white background. Windows Photo Viewers’s light blue background is your image’s background.

You are done. You would want to change all Live Tile images of your app in the same way. A transparent Live Tile image will encourage users to have your app pinned to Start screen without obstructing their beautiful background images.

Respect your users!

Download Lumia 925 Emulator Skin

Have you seen this feature demo video of Avirall? (jump to 00:50)

Do you like the emulator? This is Visual Studio Windows Phone Nokia Lumia 925 emulator skin, i created :D.

Nokia925_UP

You can also create your own app demo video with this skin! Download this skin from here.

Instructions about how to apply skin to your emulator are here.

Happy skinning, oops!

C#|XAML : ListBox – Search, Filter, and Highlight (3/3)

Highlight colors. by pasukaru76, on Flickr
Highlight colors., a photo by pasukaru76 on Flickr.

In part 1  and part 2 we set up our ListBox and search TextBox in MainPage.XAML and filtered the list on-the-fly for the text entered in the text box. To see search/filter/highlight code in action in a published app, you can download my app for free.

After having filtered the list, in this post we will add code to highlight the searched text in each field of the items. The highlighted text will be in current accent color on the device, italicized, and underlined.

Let’s open MainPage.xaml.cs and add two new fields at MainPage class level:

        EventHandler _listBoxItemsRearrangedHandler;
        bool    _trapListBoxLayoutUpdate = true;

…and in the constructor initialize the handler:

            _listBoxItemsRearrangedHandler = new EventHandler(listBoxItems_Rearranged);

In the private method prepareFilteredList, we created in Part 2, set the _trapListBoxLayoutUpdate flag and also start listening to LayoutUpdated event of listBoxTextItems:

            _trapListBoxLayoutUpdate = true;
            listBoxTextItems.LayoutUpdated -= new EventHandler(_listBoxItemsRearrangedHandler);
            listBoxTextItems.LayoutUpdated += new EventHandler(_listBoxItemsRearrangedHandler);

Add following two methods for the core highlighting logic:

        void listBoxItems_Rearranged(object sender, EventArgs e)
        {
            if (_trapListBoxLayoutUpdate)
            {
                foreach (var ob in listBoxTextItems.Items)
                {
                    ListBoxItem lbi = listBoxTextItems.ItemContainerGenerator.ContainerFromItem(ob) as ListBoxItem;
                    if (lbi != null)
                    {
                        IEnumerable<TextBlock> _allTextBlocks = ViewHelpers.GetChildrenByType<TextBlock>(VisualTreeHelper.GetChild(lbi, 0));
                        foreach (TextBlock _txtBlock in _allTextBlocks)
                        {
                            if (
                                (
                                _txtBlock.Name == "templateTextBlockName" ||
                                _txtBlock.Name == "templateTextBlockNote" ||
                                _txtBlock.Name == "templateTextBlockAdd"
                                ) &&
                                _txtBlock.Text.ToUpper().Contains(textBoxSearch.Text.ToUpper())
                                )
                            {
                                HightlightText(_txtBlock, textBoxSearch.Text);
                            }
                        }
                    }
                }
                _trapListBoxLayoutUpdate = false;
            }
        }
        public static void HightlightText(TextBlock textBlockTarget, string highlightedText)
        {

            string Text = textBlockTarget.Text;
            textBlockTarget.Inlines.Clear();
            int _indexOfHighlightedTextInTarget = Text.ToUpper().IndexOf(highlightedText.ToUpper());
            Color highlightColor = (Color)Application.Current.Resources["PhoneAccentColor"];
            Run r = new Run();
            r.Text = Text.Substring(0, _indexOfHighlightedTextInTarget);
            textBlockTarget.Inlines.Add(r);


            r = new Run();
            r.Text = highlightedText;
            r.FontWeight = FontWeights.Bold;
            r.FontStyle = FontStyles.Italic;
            r.TextDecorations = TextDecorations.Underline;
            r.Foreground = new SolidColorBrush(highlightColor);
            textBlockTarget.Inlines.Add(r);

            r = new Run();
            r.Text = Text.Substring(_indexOfHighlightedTextInTarget + highlightedText.Length, Text.Length - (_indexOfHighlightedTextInTarget + highlightedText.Length));
            textBlockTarget.Inlines.Add(r);
        }

F5 and when the form is up, type Bill in the text box. You will notice as you are typing list is filtering and the text being typed in the text box is getting highlighted in different fields of the items in the ListBox.

highlight

A more extensive implementation can be found in this app.

Hope you find this code useful.

Happy searching/filtering/highlighting 😀