Prototype iPhone Apps in SketchFlow

Prototype iPhone Apps in SketchFlow

Edit: Updated for iPhone 6

Download projects from GitHub.

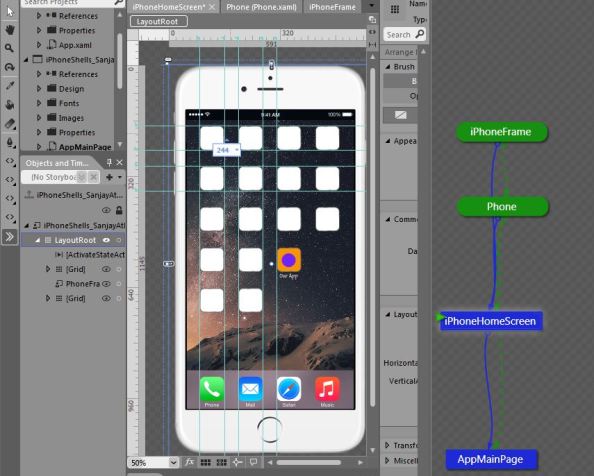
SketchFlow is a powerful prototyping tool. In last post I shared Windows Phone SketchFlow template project. Here I am sharing iPhone skeleton project for SketchFlow. Both these projects are similar in functionality with different phone frames. Android projects are on their way.

Download projects from GitHub.

Excerpt from earlier Post:

Those who have exposure to Visual Studio Blend, WPF/Silverlight developers, SketchFlow comes as natural extension to quickly prototype app ideas. Other prototyping tools are – Pencil, Balsamiq,Axure, SmartDraw, Visio etc. Recently, I wrote an introductory post about open source prototyping tool, Pencil, with example navigation flow screens. In my experience I found SketchFlow to be very efficient in creating high-fidelity prototypes. This project template gives, out-of-the-box, phone frame images, dummy keyboard with interactive states, back button, and home button. The phone frame images included are – Windows Phone emulator stock image, Nokia Lumia 925, Nokia Lumia 1520, and HTC One. Android phones and iPhone are in plans.

For a quick demo, have a look at this video:

Following are some screen shots of the SketchFlow player:

SketchFlow Prototype Project iPhone iOS Keyboard Windows Phone AppDev Blend Visual Studio WFP XAML Animation

SketchFlow Prototype Project iPhone iOS Keyboard Windows Phone AppDev Blend Visual Studio WFP XAML Animation

Prototype Windows Phone App in SketchFlow

Prototype Windows Phone App in SketchFlow

Download the template project from GitHub.

[This post got a mention on Microsoft Channel 9 This Week]

SketchFlow is one of the best prototyping tools available. SketchFlow is part of Blend which is now an integrated tool with Visual Studio. Those who have exposure to Blend, WPF/Silverlight developers, SketchFlow comes as natural extension to quickly prototype app ideas. Other prototyping tools are – Pencil, Balsamiq,Axure, SmartDraw, Visio etc. Recently, I wrote an introductory post about open source prototyping tool, Pencil, with example navigation flow screens. In my experience I found SketchFlow to be very efficient in creating high-fidelity prototypes. SketchFlow provides free form screens to create any type of prototypes – web site, web app, SPI, desktop app, or smartphone apps. This is powerful. But, with great power comes great boilerplate work :D. I so needed some kind of Windows Phone specific template project in SketchFlow which I could use to quickly draw my pages in and let template take care of generic phone specific look and feel (interactions). I didn’t find one. So I created one. This project template gives, out-of-the-box, phone frame images, dummy keyboard with interactive states, back button, and home button. The phone frame images included are – Windows Phone emulator stock image, Nokia Lumia 925, Nokia Lumia 1520, and HTC One. Android phones and iPhone (available now) are in plans.

Watch this video for a quick go through of the project and also to know how you can swap phone frames in seconds, throughout all prototype screens in the project:

Following are some of the screen shots of the project in action:

SketchFlow Prototype Nokia Lumia 1520 Windows Phone AppDev Blend Visual Studio

SketchFlow Prototype Project Nokia Lumia 1520 Windows Phone AppDev Blend Visual Studio

SketchFlow Prototype Application Emulator Windows Phone AppDev Blend Visual Studio

And yes, with my other project you can create prototypes for iPhone in Microsoft SketchFlow.

Happy mocking-up! 😀

App Marketing: Perspective Marketing Image Template

App Marketing: Perspective Marketing Image Template

[This post got a mention on Microsoft Channel 9 This Week]

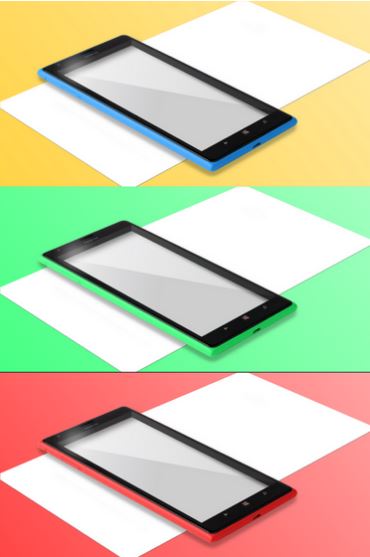
Nokia Lumia 1520 is a gorgeous phone. So is your Windows Phone app’s hub in panorama. And you do know that a well developed app is just the half way. Getting the app to its audience is the second half. I created this layered GIMP image to easily sandwich a panorama hub between the layers and showcase your app with your own shining colors. You need to do following to create your app’s panorama with this template:

  • Have all your panorama pages in a single image. 4 or 5 pages will work great.
  • Copy aforesaid panorama image in this XCF.
  • Adjust perspective, add your colors, and export!

With very little efforts you can have your app in your choice of colors.

Combined

Following is the detailed step-by-step of the process with example of Windows Phone Channel 9 app:

First, grab the GIMP XCF (PSD here). If you do not have GIMP, download here, it’s open-source and free. Prepare an image of all the panorama items of your app (a little help here).

Layers!

01
Open PanoramaAppShowcaseOn1520.xcf in GIMP. Look at the Layers windows. There are multiple groups and layers inside. Some layers/groups are not editable. Their names start with [DoNotEdit]. So, do not edit them. The layers you will be editing are – “YourApp.YourAppGoesHere”, “UseBucketToolAndFillAnyColorHere”, and “UseBucketToolAndFillBackgroundColor”.

Bring Your App In

02

  1. Open “YourApp” layer group and select “YourAppGoesHere” layer.
  2. Copy or Open As Layer from File menu, your app’s panorama image. If you Open As Layer, drag it down to just above YourAppGoesHere and right click and merge down. If you copy, as you see in image, a floating layer will be created.
  3. Click on Anchor the floating button at the bottom. You will see now your panorama image is in the layer YourAppGoesHere

Prepare to Skew

03

  1. Make sure YourAppGoesHere layer is selected.
  2. Slide opacity to about 50.
  3. Select Layer > “Autocrop Layer” menu to crop this layer. You will see yellow marching ant line around the layer
  4. Choose perspective tool.

Go 3D

04
The layer now has a grid with 4 handles on corners.

  1. Grab a corner and drag it as close as possible to the corresponding corner on white base. Don’t worry about matching corners exactly, just keep close. Repeat the process for all corners. Look at black arrows in the image.

Now your image’s layout looks something like this:
04a

Micro Adjust and Transform

05
You are still in Perspective transform edit mode. Here you will zoom-in to every corner and match every corner exactly with the corner of the white base.

  1. To zoom-in to the corner you want to adjust, take your mouse pointer on the corner, and ctrl+mousewheelup to zoom-in max. Match both the corners pixel perfect. Repeat for all the four corners. Zoom-in and out to make sure all the corners are matching.
  2. Click on Transform button.
  3. Your image now looks something like this:
    05a

Your Colors

06

    These steps are to easily change phone’s color.

  1. Select UseBucketToolAndFillAnyColorHere layer.
  2. Click on foreground color and pick a color from color picker.
  3. Select Bucket tool from Tools menu
  4. Click anywhere inside the image

More Color and Done

07

  1. If you want to edit background color select UseBucketFillBackgroundColor.
  2. Click on foreground color and pick a color from color picker.
  3. Click anywhere on image
  4. Open File menu and select Export As… Type “filename.png” in the File Name field and save.

If everything goes well, you will have a gorgeous image like this for your app:
08

And this is my app in the same template:
Avirall | Windows Phone | Timer | Stopwatch | Sports | Nokia | Nokia Lumia | Windows Phone 8.1 | Panorama

App Mock Up

App Mock Up

You are toying with an idea of creating a new app. If you are not replicating functionality of some other app, you would go through the process of visualizing your idea in the form of app UI. You don’t want to jump into code at this time but want to feel how information in the app will be placed and how it will look inside the screen boundaries. This process is a pre-cursor to UX development or full-fledged wire-frame creation. This process of visualizing the idea takes some time before you are confident about how you want to take your app forward and jump into some sort of coding. Paper+pen or whiteboard+marker are good way to work through fluid ideas and layout information. This is not the phase when you are working on UX or designing UI, but just laying out ideas in rough screens. I personally like drawing and love to draw on paper/whiteboard. It is difficult to work with physical media if you are going through multiple iterations and changes (owing to fluid nature of this phase), even if you are good at drawing. For the reason of sheer manageability I would rather go for some GUI authoring tool with which I can directly drag+drop shapes, connect them, group them, size them and play around with ideas. Using GUI authoring tool is cleaner and easier if you are not into drawing. There are many such tools available out there with their strengths and weaknesses. Microsoft Office Visio, Sketch Flow, Concept.ly, Balsamiq Mockups, etc are some of the popular mockup creation tools. In this post I will talk about Pencil.

[Side note] If you are into SketchFlow and Windows Phone app development, you will find my project template useful. Check it out here. In following episode on Channel 9 Brian talks about my project at 06:12 mark.

Pencil is an open-source and free GUI authoring tool. With Pencil you can quickly create mockups and walkthroughs. Pencil is flexible to extend. It has pre-built basic shapes and also platform specific shapes (Visio calls them stencils, Pencil calls them shape collections) like Web, iOS, and Android. But you could make a mockup for Windows Phone as well. For this post I quickly created this panorama concept with Nokia Lumia, Windows Phone-

WPPencilWireFrame

This mockup is created with Sketchy GUI collection. Sketchy is a nice visual representation of ideation phase. In Pencil you have choice to use other standard and straight shapes. Shapes are flexible for customization to your requirement.

Pencil is a nice and simple tool. For small sized apps and quick ideation processes Pencil is very good. Pencil does not automatically generate code. Though it does generate clickable HTML but they are static HTML’s, not controls. Pencil is not good if your ideation process goes large and you have more than 10 screens to mockup in a single document (you will keep multiple screens in one document because you want to link them for click-through). With more than 10 screens in a single document Pencil goes very slow, painfully slow. Also, it seems, Pencil community may not be actively updating it. Last update was in 2012. If these things bother you, look at Sketch Flow or you might want to consider Visio. You can get 90 day trial of Microsoft Office Visio for free here.

For quick and small ideation process I liked Pencil, with its current abilities. I will soon try to do a quick video on basic tasks in Pencil.

C#|.NET Query String in Uri

C#|.NET Query String in Uri

In a not-so-basic-application you might have pages which are used for multiple similar purposes. You pass query string with many fields with multiple values between such pages (or web pages). In database driven apps, parameter values could be user generated and stored in the back-end and you pull more info from database on the basis of the value in query parameter. This is not the scenario of back-end driven app. This is more about “Field Names” and Values, which are part of the design and known to you while coding, and you want to manage them effectively and make the code more readable.

Let’s take an example:

You have a page in your app which loads different lists (ex: city, state, pin, salutation, etc.) and lets user select an item from the list. At different places in your app you pop this page up with required parameters to load appropriate items. The call to page looks something like this:

this.NavigationService.Navigate("/ListPicker.xaml?ListType=city",UriKind.Relative)

Let’s assume your page also has the ability for editing and you want to activate appropriate functionality (select only || edit). You would add one more parameter to your query, like so:

this.NavigationService.Navigate("/ListPicker.xaml?ListType=city&FormType=select",UriKind.Relative)

If you have many such pages, each have multiple fields and their multiple values, and you make calls to these pages from different places in your code, soon it will be very difficult to manage hard-coded query strings in Uri’s.

Here comes enum based solution:

We will have enums for fields and their values. For the purpose of this example we will keep single enum for fields and multiple enums for values for different fields. Let’s code
First define enums for fields and their values:

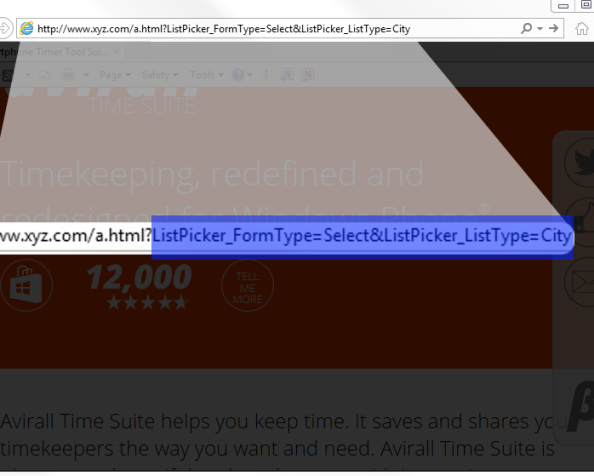
        internal enum QueryFields { ListPicker_FormType, ListPicker_ListType };
        internal enum ListTypes { City, States, Zip, Salutation };
        internal enum FormTypes { Select, Edit };

If you do not wish to be more detailed, you could simply build your Uri’s like so:

This.NavigationService.Navigate("/ListPicker.xaml?{0}={1}",QueryFields.ListPicker_FormType.ToString(), FormTypes.Select.ToString());
//The resultant uri - /ListPicer.xaml?ListPicker_FormType=Select

We will see below how you could parse query parameters in the called page and retrieve values in enum types.

Creating Uri as above still has string formatting which is not easy to maintain in multiple uses. To make things manageable and less error prone, let’s create a new enum for pages in the app and shift Uri building code in a single method which could be called from anywhere in the app with different field and values.

        internal enum AppPages {ListPicker, Setting, Main, etc };
        internal static Uri GetUri(AppPages appPage, params KeyValuePair<string, string>[] args)
        {
            string uriString = "";
            switch (appPage)
            {
                case AppPages.ListPicker:
                    uriString = "/Views/ListPicker.xaml";
                    break;
                case AppPages.Setting:
                    uriString = "/Views/Settings.xaml";
                    break;
                case AppPages.Main:
                    uriString = "/Main.xaml";
                    break;
                default:
                    uriString = "/Main.xaml";
                    break;
            }
            int counter = 0;
            string seperator = "?";
            foreach(KeyValuePair<string, string> query in args)
            {
                if (counter > 0) seperator = "&";
                uriString = String.Format("{0}{1}{2}={3}", uriString, seperator, query.Key, query.Value);
            }
            return new Uri(uriString, UriKind.Relative);
        }

With GetUri, you could create page navigation Uri with enums only instead of hard-coded strings:

            KeyValuePair<string, string> query_1 = new KeyValuePair<string,string>(QueryFields.ListPicker_FormType.ToString(), FormTypes.Select.ToString());
            KeyValuePair<string, string> query_2 = new KeyValuePair<string,string>(QueryFields.ListPicker_ListType.ToString(), ListTypes.City.ToString());
            This.NavigationService.Navigate(GetUri(AppPages.ListPicker, query_1, query_2));

Once you are navigated to your page, you need to parse query strings and extract enums which you could use in the page to decide page’s functionality.

At page level you need to have required enum type fields. For this example we will have two fields, one FormTypes type and other ListTypes type. A private processQuery method which accepts a dictionary sets these two fields appropriately.

        FormTypes formType;
        ListTypes listType;
        private void processQuery(Dictionary<string, string> query)
        {
            string _formTypeName = "";
            string _listTypeName = "";
            query.TryGetValue(QueryFields.ListPicker_FormType.ToString(), out _formTypeName);
            query.TryGetValue(QueryFields.ListPicker_ListType.ToString(), out _listTypeName);
            if (_formTypeName.Length != 0) formType = (FormTypes)(Convert.ToInt32(_formTypeName));
            if (_listTypeName.Length != 0) listType = (ListTypes)(Convert.ToInt32(_listTypeName));
        }

You would call processQuery method from OnNavigatedTo method of your page.

        protected override void OnNavigatedTo(System.Windows.Navigation.NavigationEventArgs e)
        {
            Dictionary<string, string> _params = new Dictionary<string, string>(NavigationContext.QueryString);
            processQuery(new Dictionary<string, string>());
        }

If you have 100’s of case statements (to choose a page) in GetUri, and you are concerned about performance, refactore the method to accept page name with path as string. With page path name directly in string, you would not need case statements. By the way, in my case with about 80+ cases to get PageName, the query creation does not take more than 50MS, which is negligible for me. More so, navigation calls are not recursive ones.

Accelerate App Reviews

Accelerate App Reviews

Asking for review in your app? It’s tricky. If not done with due diligence, on encountering your request to review, users might get annoyed and still worse, they could rate your app low even though they liked it. A simplistic solution of asking for review after N days from installation (or first use) and N days after user has chosen “remind me later”, is not an appropriate solution. Why? User might have installed your app, ran it, exited, came back after N days and they were presented with a review request message, whereas, they had only used the app once. This is not a nice experience. Asking for review when user is exiting the app is less effective because user already has something else in their mind when they are coming out of the app.

Though there is no one solution that fits all, but this is how I try to tackle this scenario in my app. It’s not the “number of days” but “total minutes user has used your app” is my criteria to decide the interval of popping review message. I keep a record of overall usage of the app, and after a designated number of minutes, I pop a request to user. You might have to go through some trial and error to come up with the right “number of minutes” when you want to request. Determine whether your app is highly immersive or a quick open and shut type of app. In an immersive app|game you might want your review requests at longer intervals. In a less immersive app, you would rather ask earlier and at a less frequency. Then, you might want to gradually decrease the interval between requests during session. Don’t forget to code your logic in such a way that you could easily tune request intervals and accumulative usage time and update your app as soon as you realize that a change in the times is required. Here is pseudo-code for indication purpose:


[THIS IS PSEUDO CODE FOR INDICATION ONLY]

constant int POP_REQUEST_AFTER_ACCUMULATIVE_USAGE (adjusting knob) 
constant int POP_REQUEST_INTERVAL (adjusting knob : Initial interval between requests in the session) 
constant int POP_REQUEST_INTERVAL_DECREASE_BY (adjusting knob : Decrease interval after every request) 
constant int POP_REQUEST_INTERVAL_MINIMUM (adjusting knob : interval should not go below this)

int AccumulativeAppUsage (persist this info in storage)
DateTime LastReviewRequest;
Int ReviewRequestInterval = POP_REQUEST_INTERVAL;

App.Start | App.Activate
	DateTime AppStart
	LastReviewRequest = DateTime.Now //reset

App.Stop | App.Deactivate
	AccumulativeAppUsage += DateTime.NOW – AppStart
	Save AccumulativeAppUsage

Page.[identify the event which triggers PopRequest method]
	PopRequest()

PopRequest()
	totalUsageTillNow = AccumulativeAppUsage += DateTime.NOW – AppStart
	if(totalUsageTillNow >= POP_REQUEST_AFTER_ACCUMULATIVE_USAGE)
	{
		If(DateTime.Now – LastReviewRequest >= ReviewRequestInterval)
		{
			Show review request
			LastReviewRequest = DateTime.Now
			If(ReviewRequestInterval > POP_REQUEST_INTERVAL_MINIMUM)
				ReviewRequestInterval -= POP_REQUEST_INTERVAL_DECREASE_BY
		}
	}

Transparent Live Tile For Windows Phone 8.1

Transparent Live Tile For Windows Phone 8.1

Windows Phone 8.1 Dev Preview

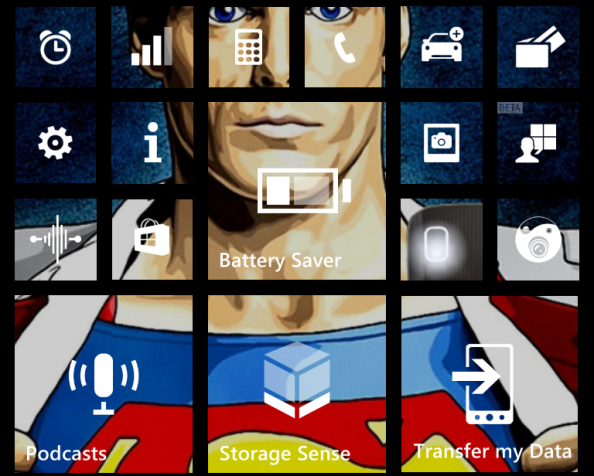
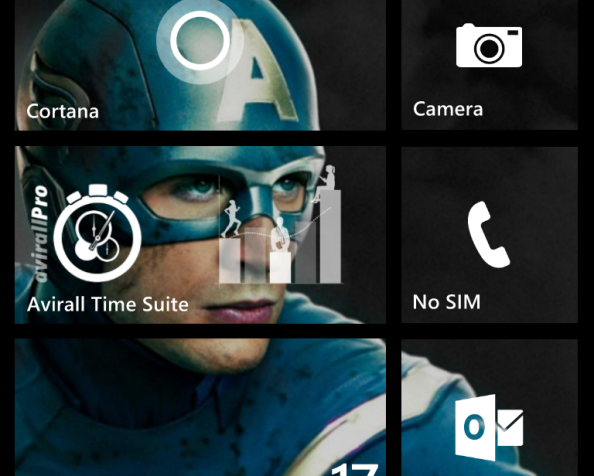
Windows Phone 8.1 developer preview is totally awesome. So what is one of the most important things app devs can do right away, without much fuss, to make their apps look great with Windows Phone 8.1? Revisit your app’s Live Tile images. Why? In 8.1, Start screen is mesmerizing with the parallax effect and Live Tile with background overlay. Dev preview users are going crazy with new Start experience, and I am sure, with public release, end users are going to love to have background image as well. Take a look at this awesome Nokia Lumia 925 Start screen:

wp_ss_20140416_0015[1]

When users have a background image, they might not like to have solid Live Tiles block their beautiful background. So, revisit your app’s Live Tile images – all of them! Check if they are transparent or not? If they are like Cortana, Avirall Time Suite, etc. in the image above, you are all set. You can safely ignore this article and find some other awesome way to improve your app for WP8.1 (think Cortana). If they are not, I suggest to update ‘em ASAP. And it’s easy, too. Let’s see how you can create transparent Live Tile images with Open Source Inkscape. You could choose to use Paint.NET (not MS Paint), Photoshop, GIMP, or any other tool which allows you to export image with transparency. Though I prefer GIMP for image editing but I chose Inkscape for this demo. Let’s go.

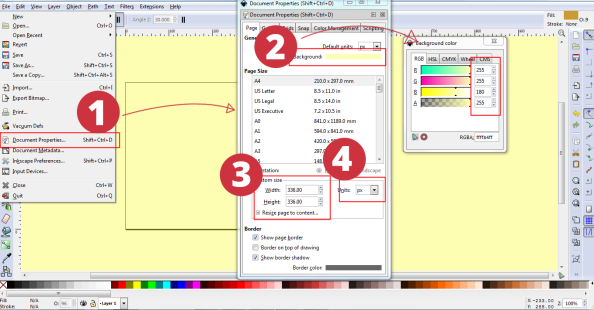
Step 1: Setup the page

InkScape01

  1. Open Inkscape and create a new document and Open Document Properties from file menu.
  2. In most cases app icons are solid white, if yours is one too, change the background color of the page, temporarily, to light yellow. This is while working only so that you can see white color. Before exporting we will reset this to transparent (this is very important).
  3. This example is for 336 X 336 medium tile. So set the custom size to 336 X 336.
  4. Make sure Units is “px”.

Step 2: Setup the drawing

InkScape02

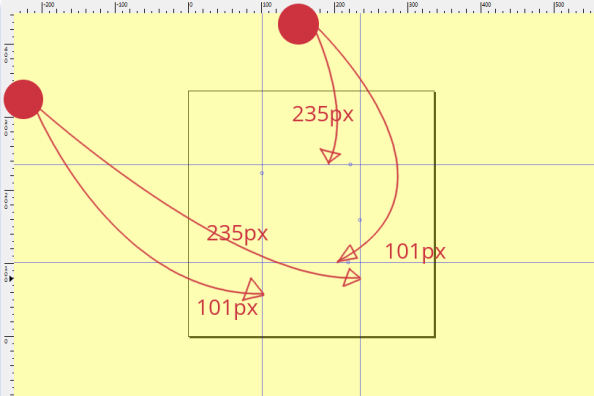
Windows Phone 8 Asset Template Guide suggests a 336 X 336 tile to have 110px margin on all sides. Create 110px margin guides on all the sides. To create margin guides click and drag from the horizontal ruler on the top and from the vertical ruler on the left.

Step 3: Create Live Tile image of your app

InkScape03

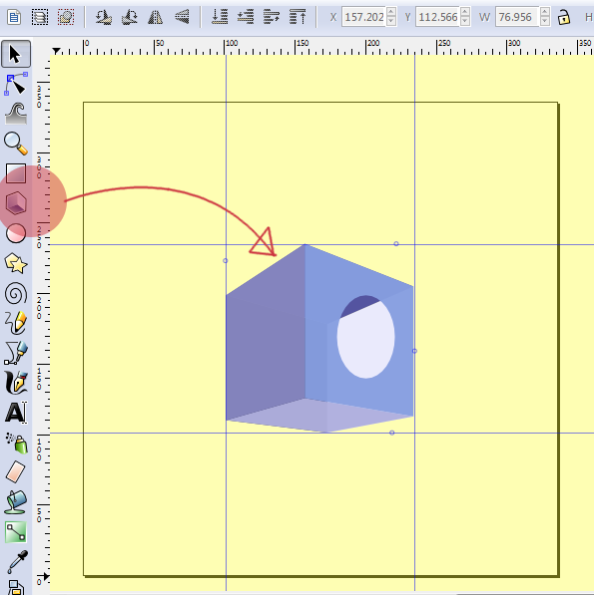
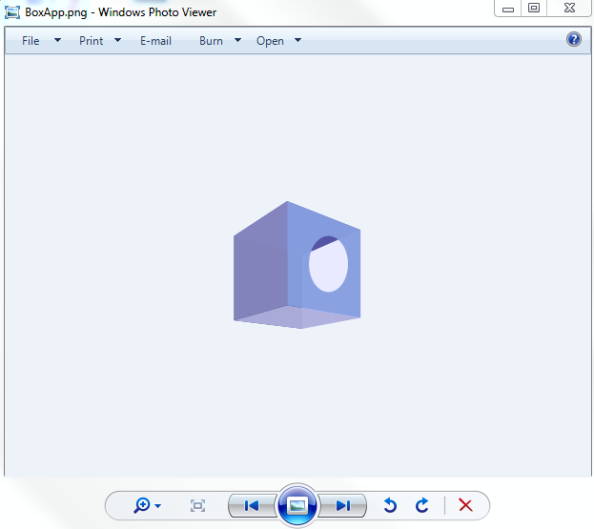
The center part between the margins is the space where your tile image will go. Create your image here. For this example I simply dragged the box from tool box and made a hole in it 😀

Step 4: Set background to transparent

InkScape03a

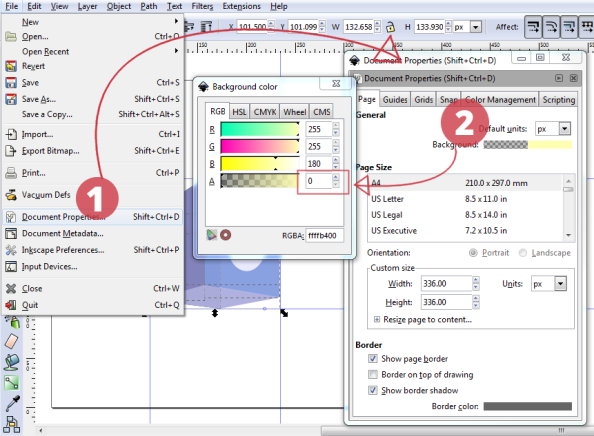
To create a transparent Live Tile image we would like to have a transparent background. Go back in document properties and set Background to transparent by resetting “A” to 0. If your image is solid white, you might not see anything after making the background transparent. Don’t worry, your image is there (maybe somebody can tell how working space (not document background) in Inkscape can be made a different color than white).

Step 5: Export

InkScape04

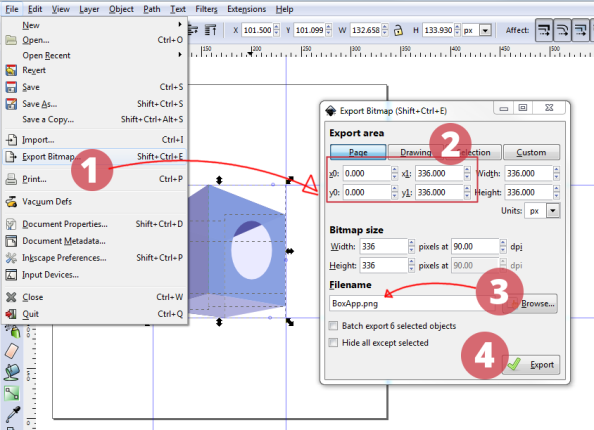
  1. Open Export dialog from File > Export Bitmap…
  2. Set X0, X1, Y0, Y1 as shown in the image above.
  3. Browse for the image location, and make sure you give “PNG” as the extension of the image, NOT JPG or BMP.
  4. Export. (Alternatively, as suggested by Austin Andrews, you could export as SVG, and use his awesome service!)

Step 6: Check Final Image

WindowsPhotoViewer05

Notice that your final image does not have a white background. Windows Photo Viewers’s light blue background is your image’s background.

You are done. You would want to change all Live Tile images of your app in the same way. A transparent Live Tile image will encourage users to have your app pinned to Start screen without obstructing their beautiful background images.

Respect your users!

Cortana, Sing Me A Song…

Cortana, Sing Me A Song…

Here is a quick trial of Cortana on WP8.1 dev preview on my Nokia Lumia 925. The funniest one is:
Me: “Sing me a song”
Cortana: “O Danny Boy the pipes are pipes are calling” 😀

See for yourself some fantastic capabilities of Cortana along with some funny takes, 0_0 :

App Marketing: Panorama Image Template

App Marketing: Panorama Image Template

(An improved one with perspective)

If your app has a panorama hub, an image showing all the pano items with device could be a very impressive marketing image. I have created this template which makes your life a bit easier, if you want to create such image. You can download the template XCF image file here (yes this is a GIMP template 0_0. I may create PSD edition if you insist). Currently the device image in this template is Microsoft Windows Phone stock emulator image, Nokia Lumia device images could also come in future. When you open this XCF in GIMP you get something like this:

MarketingCompInGiMP

Take snapshots of your app’s pano items from emulator and replace screen 1, 2, 3, and 4 in GIMP with respective images. Once you are satisfied with the image, export it to JPG/PNG with File > Export option. You might want to scale the image down before you send it out. Open the exported JPG in GIMP and use Image > Scale option to scale the image to desired scale.

Notes:

  • This is 1080P edition (480X800 version is on its way, see below), so your emulator/device screen shots should also be 1080P.
  • If your pano has BG image, disable it before you take screen shots and give it a plain #00ff00 color. After copying the screens in GIMP, select #00ff00 color in layer and replace it with alpha. Repeat for all pano items. In the end have a stitched, single background image, and copy it on the background layer in GIMP. You are doomed if you have #00ff00 color in other parts of your pano images, other than BG :-D. (Just kidding, choose some other color for BG which is unique).
  • Because of parallax effect in panorama, you will get repetitive panorama title in your app’s screen shots. Initially, copy the screen as they are. Then, in GIMP, with Rectangle selection tool (R), select the title part, Ctrl+X and Ctrl+V to make another layer. Do same with all the pano items. Select Move tool (M) and move pano item 2, 3, 4’s title sections to left to adjust with pano item 1.
  • Watch this space for a 480X800 version. Or follow me on Twitter @sanjayAtPilcrow.